youth soccer tiers

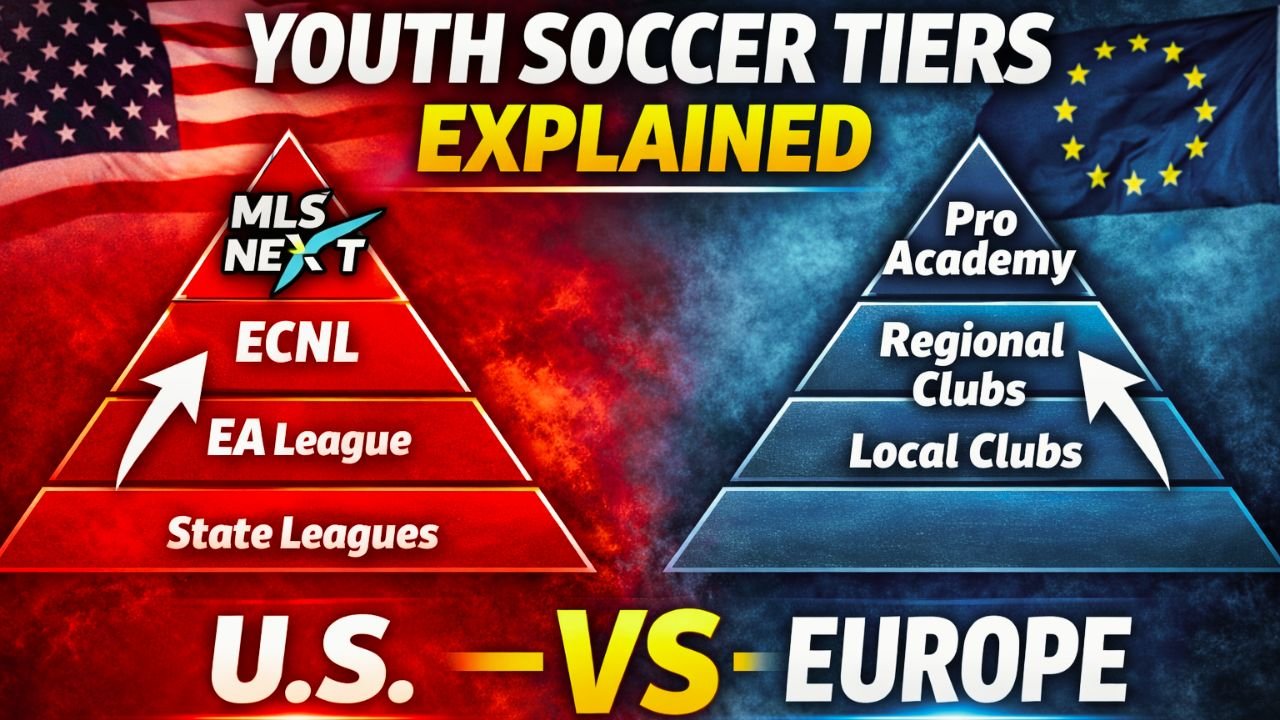
Youth Soccer Tiers Explained: US vs Europe

If you’ve spent more than five minutes around youth soccer, the topic of of youth soccer tiers have come up. Then you’ve probably heard phrases like:
“MLS NEXT is the top.”
“No, ECNL is better.”
“Elite Academy is catching up.”

And somewhere in all of this, using only the inner voice there is the most important question:
What level is this actually?

Let’s clean this up. Clearly laying out the youth soccer tiers in the United States… and then comparing them to how youth soccer works in Europe.

By the end of this video, you’ll understand why these systems feel so different, why arguments never end, and why “top level” doesn’t always mean what people think it means.

HOW THE US SYSTEM OF YOUTH SOCCER TIERS WORKS

The most important thing to understand is this:
US youth soccer is not a pyramid.
It’s a ladder built by organizations.

There is no promotion and relegation. Teams don’t rise or fall based on results. Instead, clubs apply, are accepted, or are excluded.

So, when we say that there is a pay-to-play by the players, there is a pay-to-play by the clubs, too. If a club has a great president that managed to file the paperwork and convince the league to let them register, then just send the money to the organization and they are good to go. Now here are the youth soccer tiers of the ladder.

TIER 1 – NATIONAL ELITE

At the top of the US system, we find the leagues that are supposed to contain the best players.

MLS NEXT
This is the top tier for elite boys. It’s officially run by Major League Soccer and designed to feed directly into professional teams and the youth national team selections are usually from these teams. Training volume is very high within the teams, and players often have individual practices, too. Competition is intense. And the best players are genuinely challenged every day. For boys, this is the clearest professional pathway in the US.

Girls Academy

The equivalent on the girl’s side is Girls Academy. It was founded in 2020, so it’s definitely suffering from inconsistency and structure in some areas. There are conferences and regions where it’s absolutely the best, while other clubs and regions are way behind. At the top, we are talking about the players that end up in the US Women’s National Team, so best in the world.

ECNL (Elite Club National League)

Then there’s ECNL (Elite Club National League), which often is just behind the MLS Next and the Girls Academy, but sometimes ahead. There are cities where the top team plays ECNL, and it recruits the best players in that city. That’s totally fine and not a downgrade. In both the girls’ and the boys’ side, the end goal is college recruiting. Most players will not end up playing professional, at least right away. Instead, they will aim to get a scholarship to play soccer for a college team. So, the structure is similar with several trainings per week, often 3 or 4, and often travel in different states for games.

TIER 2 – HIGH-LEVEL NATIONAL AND REGIONAL

One step below the top is where things start to blur.

Here we find leagues like:

  • ECNL Regional League
  • Elite Academy League (EA)
  • National Academy League (NAL)

These leagues position themselves as elite alternatives or pathways upward. The ECNL Regional Leagues are firstly cheaper than the ECNL national league. Less travel and tournaments across the country. But often times that doesn’t correlate with the quality and there are incredibly good players playing at the top levels of the ECNL national leagues.

EA is even more confusing – the range between the top and the bottom EA team is even larger. The Elite Academy can be elite and compete with Tier 1 teams. Then there are clubs that joined the EA two decades ago and the entire coaching staff that created the club was replaced with coaches that see this as a job or a side job in some cases. The clubs focus on recruiting, marketing and finance, so that keeps EA happy and the other clubs enjoy battering them regularly to show dominance for their own recruiting.

Overall, all three leagues are competitive and have teams that practice usually several times per week, then travel to other states for games.

TIER 3 – STATE AND MULTI-STATE COMPETITIVE

This is where the majority of youth players live. Many of the clubs in Tier 1 and Tier 2 leagues have their second teams here.

Leagues like:

  • US Youth Soccer National League Conferences
  • State Premier Leagues
  • NPL divisions

Here, the experience depends heavily on geography. In strong soccer states, this level can be excellent. In weaker regions, the gap to the top can be large. The practices are usually 2-3 times per week, plus a game on the weekend. The travels are regional, mostly within the state or the neighboring states.

For many players, this is a very appropriate level. Development still happens here and the goal for many of these players is to get to the upper tier by end of high school. Others will see that their bodies cannot handle soccer at competitive level on a 3-4 times per week schedule. And that is fine. They will probably not continue with the objective of becoming professional soccer players.

TIER 4 – LOCAL COMPETITIVE

Below that, we have local competitive leagues. These are organized. They have structure. They matter to communities.

But the emphasis shifts:

  • Less travel – usually only 1 or 2 hours by car
  • Less training – once or twice per week
  • Less pressure – there really isn’t much difference if it’s top of the league or bottom
  • Mixed coaching – some coaches have very little soccer knowledge, while others actually coach upper teams and this is just another team they coach.

This is still soccer. Just not a professional pathway. If a player doesn’t show the ambition to progress toward the upper tiers in their high school years, the chances become very slim to continue to a more serious soccer career.

The clubs in Tiers 1, 2 and 3, often have several teams in these competitions. They use them both as recruiting vehicles, where the best players of these teams try to make the upper team. Or simply they have them as business – they charge the players yearly fee and after paying the coaches and the fields, they have money left over to invest in the club.

TIER 5 – RECREATIONAL

At the base is recreational soccer. This is where most players begin. And for many, where soccer stays. The goal here is participation, enjoyment, and learning the game. Not exposure. Not rankings. Not scholarships. Sometimes there are practices, but even they look like just games. And the coaches are often volunteers, usually a parent of one of the players, focusing more on making sure things are safe and pleasant, rather than competitive. I’ve had players who simply don’t like the competitiveness of soccer. Others are having a tough time at school or at home, so they need a year or two where results don’t matter. Either way, it’s vital to have these leagues to spread the sport and also to give healthy environments for the youth.

HOW EUROPE YOUTH SOCCER TIERS WORK

Now let’s cross the Atlantic. Because Europe doesn’t argue about youth soccer tiers nearly as much.

Why?

Because the system does the sorting for them.

THE EUROPEAN PYRAMID

In Europe, youth soccer is tied directly to clubs.

At the top are professional academies.

These are connected to first teams playing in professional leagues. Players don’t sign up. They are selected. There aren’t multiple youth teams for each year, and it’s not about how much the families can pay. Instead there are scholarships and the demands are different.

Players often live together at a boarding school attached to the training ground. They have opportunities to practice with the B team or even the first team. They practice and play in the same philosophy as the seniors. Then you see these players having classes in the morning and play with the first team in the evening. The expectation of these players, even when they are in their early teens is to become professionals. So they think and live football every day, same as the first team.

This is Tier 1.

BELOW THE TOP

Under the biggest academies are:

  • Smaller professional clubs
  • Semi-professional academies
  • Strong regional development centers

Players move up and down constantly, usually at the end of each season. In this case, it is very clear which team is at which level. A player released by Barcelona would go play for Espanyol, but not the other way around. A player released from Arsenal or Chelsea can stay in London and play for Millwall or Queens Park Rangers, but not the other way around.

Get released? You drop a level. Perform well? You get noticed. No applications. No politics. Just performance.

AMATEUR ELITE AND LOCAL CLUBS

Below that sits a large base of amateur clubs. The funding of these clubs cannot compare to the clubs at the top of the pyramid. The top clubs have more staff in their offices than the bottom clubs have players.

These clubs:

  • Play in leagues with promotion and relegation
  • Face stronger or weaker opponents based on results
  • Exist within a real competitive pyramid

And here’s the key difference.

In Europe, the level finds you based on the performance on the field.
In the US, you choose the level based on the finances.

WHY THE YOUTH SOCCER TIERS FEEL SO DIFFERENT

This is where arguments start.

In the US:

  • League names carry status
  • Access often depends on money and location
  • Players can stay in top leagues without winning

In Europe:

  • Results matter
  • Clubs rise and fall
  • Players are filtered constantly

That’s why European coaches talk less about leagues and more about players.
And why American conversations often start with logos and acronyms.

THE MOST IMPORTANT TRUTH

Here’s the part that matters most.

The best level for a player is not the highest of the youth soccer tiers available.
It’s the level where they:

  • Play regularly
  • Are challenged but not overwhelmed
  • Develop confidence and understanding

A bench player in Tier 1 is not automatically developing better than a starter in Tier 2 or Tier 3.

Development is not a badge. It’s a process.

THE IMPORTANCE IS NOT THE YOUTH SOCCER TIERS

Youth soccer doesn’t need more arguments. It needs more clarity.

If you understand the youth soccer tiers, if you understand the systems, you can make better decisions for players, parents, and coaches.

And once you stop chasing labels, you can finally focus on what actually matters. That’s the player.

Yellow and Red Cards

Yellow and Red Cards Explained

Nothing changes a match faster than a red card. And a yellow card in the first minutes of the game can make a defender scared to make another tackle for the rest of the match. In this video, we’ll break down exactly what yellow and red cards mean, why referees give them, and how they impact a game or an entire tournament.

WHAT DO THE YELLOW AND RED CARDS MEAN?

In soccer, yellow and red cards are part of the Laws of the Game, written by the IFAB (international football association board) and used worldwide.

A yellow card is a warning — an official caution. You can only receive one yellow card per game and stay in the game. If you receive a second yellow, then you automatically get a red card.
And a red card means you are sent off and your team must continue with one fewer player. Sometimes you can get a straight red, even without getting a yellow card first.

The math of cards don’t end at the game. If you have collected 5 cards in the league in different matches, you will likely get a ban of one match. Same punishment comes for a straight red card. However, depending on the tournament and the situation, those can vary. Sometimes the accumulated cards are cleared before the knockout phase of a tournament, so you don’t get any punishment for them. However, a straight red can also lead to extended ban, depending on the context that led to the red card.

WHO CAN RECEIVE YELLOW AND RED CARDS?

Cards aren’t only for players on the pitch. Referees can show cards to players, substitutes, substituted players, but also members of the coaching staff. While most of the cards are usually shown to the players on the field, we will focus on them. All the others are usually doing something completely inappropriate that disrupts the match. If you’re involved in the match, you’re responsible for your behavior.

WHEN DO REFEREES GIVE A YELLOW CARD?

There are seven main cautionable offences, and knowing them helps players and coaches understand a ref’s thinking.

1. Unsporting behavior

This can be because of reckless tackles or tactical fouls. For example, a tackle with the primary purpose of stopping a player going for a counter attack would often be a called a tactical foul and is a yellow card. A reckless tackle is more of the type of foul, often with some extra force. The yellow card for simulation if when a player is trying to pretend that was fouled, even though they weren’t – often to try to get a penalty, a free kick or a yellow card for the opponent. Finally, an excessive celebration is self-explanatory, but is most common when a player takes off their shirt while celebrating a goal or leaves the field and goes into the stands to celebrate with the fans.


2. Dissent

Arguing, shouting, or showing disrespect toward the referee. This doesn’t mean that you cannot say anything to the referee, but it has to be respectful and limited in the length. The referee would often warn the player to stop when it’s close to the limit, but if they don’t then a yellow card will follow.


3. Persistent fouling

Committing several fouls over time. It is up to the referee to decide what the time is and how bad the fouls were. If you jump out compared to the other players and show a pattern, you will receive a yellow card. Again, a referee would often send a final warning to the player that on the next foul there will be a yellow card.


4. Delaying the restart

Holding the ball, kicking it away, time-wasting. When a team is leading and wants to waste time, or maybe kicks the ball away after a foul to stop a counter attack, then the referee can show the yellow card to the player who causes these offenses. It is again a judgment call.


5. Failing to respect distance

Blocking a free kick or not giving the required space. Sometimes a referee needs to measure the distance, usually when the freekick is closer to the goal, and defending players must respect that distance. However, even with unmeasured distance, the players need to give reasonable space for the free kick to be taken.


6. Entering or leaving the field without permission

Rushing onto or off the field illegally. This doesn’t really happen and usually a quick check with the referee solves the issue.


7. Other illegal behavior

Such as ignoring instructions or behaving irresponsibly. It really is a catch-all for anything that a player or a coach might do that is inappropriate. We cannot predict everything that a person might do, so the rulebook gives this discretionary right to the referee.

WHEN DO REFEREES GIVE A RED CARD?

A yellow card is the referee’s way of saying:
“One more and you’re gone.”

A red card is reserved for the most serious offences. Referees don’t like giving red cards even less because it’s puts this decision as a deciding factor in the game. The seven sending-off offences are:

1. Serious foul play

Dangerous tackles that risk injury. This doesn’t mean that every injury is a red card, but also a lack of injury doesn’t mean that it’s not. The excessive force, malicious intent, or even disregard for the opponent’s safety, can all be the reasons for this. It’s hard to determine this, so often VAR (Visual Assisted Referee) helps to look at it, where they check of the severity of the foul.

2. Violent conduct

Striking, punching, elbows off the ball. The difference between this one and the previous one is that there is often no soccer involved in this one. The famous Zidane head punch was when the ball was on the other side of the field. So there is nothing to review – any significant physical contact without a play involved is a straight red card. One more bizarre case happened in the fall of 2025 where an Everton player got in an argument with their teammate, punched them and got a red card, as it is by the rulebook.

3. Spitting at someone

Automatic red. Nothing too much to discuss here. It’s been common enough over the years that the rulebook calls it out explicitly.

4. Denying an obvious goal-scoring opportunity (DOGSO)

Whether by foul or handball. We have seen both. Sometimes there is a cross to the penalty box, and the last defender does a shirt pull or the goalkeeper slides with a foul on the striker who is free in front of the goal. They often are aware of this, but they would rather take a red card for the team than let the opposition score. If an outfield player saves a shot on goal with their hand even not on purpose, it is still a red card.

5. Using offensive or abusive language or gestures

Verbal or physical insults. Again, a bit of a catch-all for any bad behavior towards the opponents, the referee, the audience and even their teammates. Any racist, nationalistic, homophobic, or even just excessively abusive and insulting language or gestures will easily result in a red card.

6. Receiving a second yellow card

Two yellows = red. It is not uncommon for a player to get a second yellow card over 90 minutes. They are often targeted by the opponents knowingly. The attackers try to play against them because they know they will need perfection or they get another yellow card. Also, a player with a yellow card sometimes got it out of frustration, so again a perfect candidate for a second one.

When a red card is shown, the player must leave immediately, and the team plays the rest of the match with 10.

CARD CONSEQUENCES AT THE WORLD CUP

Red cards are often reviewed after the match by the organizers of the league or the tournament. Sometimes that means an extensive ban of more matches and other times it might mean a shorter ban. In youth leagues, it is often a default ban without a review. In the World Cup, discipline matters:

• Yellow cards accumulate

Too many in consecutive matches can lead to a suspension. It is often 2 or 3 yellow cards that cause the suspension of one match. FIFA sometimes resets yellow cards before the semifinals to prevent suspensions in the final.

• Red cards carry automatic bans

Usually at least one match, but serious incidents can lead to more.

All World Cup matches follow the IFAB Laws of the Game, the global rulebook for soccer.

Any rule changes between now and the tournament — especially around handball, tackles, and VAR — will be based on IFAB updates.

There are no special or unique card rules for the World Cup.
The competition simply follows the laws exactly as written.

xG Explained

xG Explained: What is Wrong & How to Fix it

Let me show you a stat that has started more football arguments than VAR.

Team A finishes the game with 3.1 xG.
Team B finishes with 0.8 xG.
Final score? Team B wins 1–0.

So the question everyone asks is simple:
Did the better team lose… or did xG lie?

The answer is uncomfortable for both sides.

xG is incredibly useful.
But it’s also incomplete.
And today, I’ll show you what xG actually measures, why it’s not perfect, and how we can make it smarter.

WHAT xG ACTUALLY IS?

Let’s start clean.

Expected Goals, or xG, is a probability.
It answers one question only:

“How likely is this shot to become a goal?”

That probability is based on thousands and thousands of similar shots from the past.

Modern xG models usually look at things like:

  • Distance to goal
  • Angle to goal
  • Body part used
  • Type of assist, like a cut-back or a cross
  • Defensive pressure

So when you see:

  • A penalty worth about 0.76 xG
  • A tap-in worth 0.6 or higher
  • A long-range shot worth 0.02

That’s not opinion.
That’s history talking.

And here’s the key line:

xG does not measure finishing.
It measures chance quality.

That distinction matters more than most people realize.

WHY xG IS SO USEFUL

Before we criticize xG, we need to respect it.

xG is powerful because:

  • It removes emotion from results
  • It tells us if chances were real or fake
  • Over time, it predicts performance better than goals alone

Goals tell you what happened.
xG tells you what usually happens.

In daily life, this is like the weather forecast. We want to know if it’s going to rain tomorrow definitively, but the best we can get is the probability of rain given the information that we can get.

Let me put it differently – xG is statistics and we analyze in the world of statistics. But we live in the world of samples, where a chance can only be a goal (1) or a miss (0).

That’s why coaches, analysts, and recruitment teams rely on it.
It’s a reality check.

But reality checks only work if they don’t ignore… reality.

WHERE xG STARTS TO BREAK

Now we get to the problem.

There’s a famous idea Thierry Henry has talked about, and it goes something like this:

“The same chance is not the same chance if Harry Kane is on the end of it.”

And he’s right. The famous joke about statistician is that if one archer misses to the left and another one to the right, on average they hit the center twice. Similarly, if one player scores every time and one misses every time, the xG is 0.5.

xG treats every shooter like an average finisher for the league.

But football is not played by average players.

Let’s say a chance is worth 0.25 xG.

That means:

  • The average player scores it once every four attempts. The first team strikers might be better, scoring one in 3, or 0.33 xG.

But:

  • An elite striker might score it once every two attempts, or Harry Kane might even be over 50% of the time. On the opposite side, the average defender will need 10 chances to score.

Seemingly same shot.
Same xG.
Completely different reality.

This is why:

  • Some players beat the xG year after year
  • Others underperform season after season
  • And calling all of that “luck” becomes lazy analysis

THE ANALOGY

Let me try to explain this issue with an analogy. Think about Google in the early days.

Years ago, if you searched for something on Google,
you got the same results as everybody else.

Didn’t matter who you were.
Didn’t matter where you lived.
Didn’t matter what you searched yesterday.

Same input. Same output.

But Google evolved.

Now:

  • Your location matters
  • Your search history matters
  • Your preferences matter

The search results are adjusted to you. To be honest, their ads also did the same, so you are getting relevant ads, even if you aren’t looking for that in the moment.

Nevertheless, I am trying to say that old Google was accurate. But Modern Google is relevant. The algorithms are so good these days that you don’t even need to search for something – Youtube can suggest this video to you because they know you are interested in soccer and getting better at understanding it, while they will not suggest it to your neighbor who watches videos of underwater basket weaving all day.

xG today is like old Google.

It gives the same answer for everyone…
even though not everyone is the same.

THE REAL MISSING PIECE: THE PLAYER

Here’s the core issue.

xG answers:

“How good was the chance?”

But it does not answer:

“How good is the player taking it?”

And that’s the missing layer. The xG determined if the players field positioning was good to get into a chance to shoot, or if the teammates delivered a good enough ball to take that shot. However, that player might be shooting poorly, or through the middle or off target.

Finishing is a skill.

  • Shot selection is a skill
  • First touch under pressure is a skill
  • Composure is a skill

The context matters. If you ignore that the skill of finishing matters results in people not believing in statistics.

GOALKEEPER XG

And if the player shooting matters, does the player defending matters, too? Absolutely! We see coaches substituting the goalkeeper right before penalties. And it makes total sense. Some goalkeepers are better in certain situations. Penalties is one example, but other situations are one-on-ones, or free kicks or corner kicks. If you have a very tall and very strong keeper that regularly catches half of the corner kicks, how can you equate him to the goalkeeper that is never getting to the ball?

HOW TO FIX IT: PLAYER-ADJUSTED xG

So how do we improve xG without throwing it away?

Simple idea:
Don’t replace xG.
Upgrade it.

Step one:

  • Keep normal xG as the base

Step two:

  • Look at a player’s historical finishing
  • Goals scored versus expected goals

Step three:

  • Apply an adjustment factor for the defending players, too. The goalkeeper and if needed the defender.

Example:

If a player consistently scores 20 percent more goals than their xG,
a 0.30 xG chance becomes 0.36 adjusted xG for that player.

Now suddenly:

  • Harry Kane chances look different
  • Erling Haaland chances look different
  • Developing players look… developing

This doesn’t make xG perfect.
But it makes it closer to football reality.

Chess Ranking Concept

We can even make it better. Let’s steal a concept from chess, where if two players meet, their global score adjust after the duel. To simplify, if two players of equal rank 1000 meet, the winner takes two points, so they end up with 1002, while the defeated ends with 998. If a player of 1000 plays against a 1100 player, then a win would give them 3 points, so 1003 and 1097. However, a loss might only lose them 1 point, so 999 and 1101, because that’s the expectation – the better player to come out as a winner. We can apply the same in soccer, where if there is a situation of 0.5 xG and there it’s not a goal, the attacking player’s xG ranking might decrease to 0.49 after that, while the goalkeeper’s xG ranking will increase.

Buildout Line Explained | 7v7 Soccer (U9 & U10)

If you coach, referee, or parent youth soccer, you’ve probably asked this question:

“Why can’t teams press the goalkeeper in U9 or U10 soccer?”

I’ll explain exactly what the buildout line is, when it applies, why it exists, and how it helps player development in 7v7 soccer, especially at U9 and U10 — and even younger age groups.

WHAT IS THE BUILDOUT LINE?

The buildout line is a line marked across the field in 7v7 soccer that tells the defending team where they must retreat during certain moments of the game.

You’ll see it used in U10 and younger leagues.

Its main purpose is simple: Give young players space and time to build out from the back.

The buildout line sits between the top of the penalty area and the halfway line, depending on the field setup, but usually is about a third of the way.

WHEN DOES THE BUILDOUT LINE APPLY?

The buildout line applies in two main situations:

1. On Goal Kicks

When the attacking team has a goal kick, the opposing team must retreat behind the buildout line.

2. When the Goalkeeper Has the Ball in Their Hands

If the goalkeeper catches the ball, the opponents must again drop back behind the buildout line.

Once the goalkeeper:

  • throws the ball, or
  • plays it with their feet

The ball is in play, and the defending team is allowed to move forward and press. Remember at this age punting is not allowed.

And this is important:
Teams are not frozen forever.
They just can’t pressure until the ball is released.

WHAT IF A TEAM CROSSES THE BUILDOUT LINE EARLY?

This is where a lot of confusion happens.

If a defending player crosses the buildout line before the ball is in play, referees will usually:

  • stop play
  • ask for a retake of the goal kick
  • or give a verbal reminder, especially at younger ages

At U9 and U10, this rule is about education, not punishment. And the referee is an educator, same as the coaches and the parents. So, the referee can take a moment to explain the rule to the players if needed.

The goal is learning the game — not calling technical fouls every two minutes.

WHY DOES THE BUILDOUT LINE EXIST?

This is the most important part of the rule.

The buildout line exists to support player development.

Without it, young teams often:

  • press the goalkeeper immediately
  • force panic clearances
  • turn games into constant kick-and-run soccer

With the buildout line, players get:

  • time on the ball
  • space to make decisions
  • confidence to receive under light pressure

It encourages:

  • playing out from the back
  • short passing
  • movement off the ball
  • problem-solving instead of just kicking it long

This is about teaching players how to play, not just how to survive.

HOW THE BUILDOUT LINE HELPS DIFFERENT PLAYERS?

Goalkeepers

Goalkeepers learn:

  • composure
  • distribution
  • decision-making with their feet

They’re not rushed into mistakes every time they touch the ball.

Defenders

Defenders learn:

  • how to spread out
  • how to create passing angles
  • how to receive facing forward

These are foundational skills for 9v9 and 11v11 soccer.

Attackers

Even attackers of the opposition benefit:

  • they learn when to press
  • how to read cues
  • how to stay compact as a unit

The buildout line teaches timing, not passivity.

COMMON MISUNDERSTANDINGS ABOUT THE BUILDOUT LINE

Let’s clear up a few common myths.

❌ “You can’t press at all”
✔ You can — once the ball is in play

❌ “It forces teams to play short”
✔ Teams can still play long if they want

❌ “It’s only for weaker teams”
✔ It’s for development, not ability level

The buildout line doesn’t remove competition — it shapes it.

COACHING TIPS FOR USING THE BUILDOUT LINE

If you’re a coach, check out the two videos on my channel about pressing and about building from the back – links in the description. here’s how to get the most out of it:

  • Don’t over-coach goal kicks
  • Give players options, not scripts
  • Accept mistakes — they’re part of learning
  • Train spacing and angles in practice
  • Let players solve problems

If your team loses the ball building out — that’s okay.
That’s how learning happens.

WHAT PARENTS SHOULD KNOW

If you’re a parent watching this:

Mistakes are expected.
The buildout line is not about perfection.

Yelling “just kick it!” might feel helpful — but it works against what the players are trying to learn.

Development now leads to better soccer later.

QUICK SUMMARY & TAKEAWAYS

So, to recap:

  • The buildout line gives players space to build
  • It applies on goal kicks and goalkeeper possession
  • Pressing is allowed once the ball is in play
  • The goal is confidence, decision-making, and development
Crossing in Soccer

Everything You Need to Know About Crossing in Soccer

Crossing in soccer is one of the oldest and most effective ways of creating chances. Whether it’s a low ball whipped across the box, a deep delivery to the far post, or a clever cutback, the cross is often the moment that separates average teams from dangerous ones.

In this video, we’ll break down everything you need to know about crossing — from the perspective of the attacker delivering the ball, the different types of runs attackers should make, how defenders should deal with it, and how to train these situations at every age group. As always, there will be drills I recommend for practicing at various levels and age groups.

Part 1: The Role of the Crosser

When we talk about crossing, the starting point is always the player on the ball — the crosser. As every player action in soccer, there are three elements we need to consider – the scanning, the decision and the execution.

Scanning – Crossing in Soccer

Let’s start with the scanning. There are two key factors for the crosser, firstly is where the teammates can be by the time the ball is delivered. Notice that I talked about where the players can be, not where the players are. The crosser should have several glances of the field. That way they can see both the snapshot of the current position, but also the movie of the momentum of the players. We are looking at the empty spaces and where the players are running into, not just where we saw them last.

Opposition – Crossing in Soccer

The second factor is the opposition. And on the opposition, the most important player is the closest player to the ball. One of the best players of all time when it comes to crossing is David Beckham. While he was not the fastest or had much skills to dribble, he had to key moves. Firstly, he could sell a fake cross to actually create space for himself to actually cross the ball on the next touch. Secondly, he would use one of his teammates in a one-two move and deliver a cross with first touch.

Decision Making – Crossing in Soccer

The decision making comes with experience and is naturally linked with both the scanning and the execution capabilities. If a player doesn’t scan on the second post, then they will never attempt to deliver a ball there. And why are they not scanning the second post? Maybe because they are not good at scanning, but maybe because their execution technique is not good enough to even try that, so they already have decided against that option. Remember, the best cross is the one that matches your teammate’s run — not the one you are most comfortable or the most spectacular one.

Execution – Crossing in Soccer

Finally, the execution is about repetition and practice. You need to open your hips, approach the ball at an angle and keep your head steady when striking. The mechanics such as the exact position where you plant the supporting foot and where you strike the ball are different depending on whether you’re going for a driven low ball or a floated one. However, you need to get comfortable with 4 basic executions.

First post

If you notice your striker winning a run on the first post, you have to be able to deliver a simple ball there. It’s the closes to you and because of that you can pick different technique for a last moment adjustment of the shot. Note that if you deliver it with high velocity, then the striker doesn’t need to shoot, but it needs only a touch to guide the ball to the goal.

Second post

This can be harder because it’s longer distance. Note that usually you would hit the ball at an angle with the inside of the foot. For example, a right footed right winger delivers this ball on the second post for the left winger that is making a run. The ball will curve away from the goalkeeper and often go around the defenders that are between the goalkeeper and the attacking players.

Low ball or bouncing ball

The target here is very clear, which is for our teammate to just touch the ball and guide it into the goal. The ball will be fast and hard to control. Defenders might also struggle when a ball like this is delivered, because they need to clear it and make sure that they don’t score an own goal or kick it into a teammate or an opponent. When the ball is fast and unpredictable, it can be harder than it looks, so we see often comical own goals.

Cut back

Last but not least. The cut back cross is a signature move of intelligent players. The crosser needs to see the runner, but also the receiver must be patient and smart enough to allow both the teammates and the opponents to anticipate balls on the first and second post, and vacate the space for the cutback to work. One important thing about the crosser – the body position should still signal that the ball will be delivered on the first or the second post. It’s essentially a fake, a misdirection for the defenders, in order to sell this move.

Part 2: Runs in the Box

Crossing only works if attackers make intelligent runs. The most important thing we are looking for when making runs is to identify the empty space that we can run into. It’s less of a picture and more of a movie – we are looking few frames ahead where the player can be and where the ball should be delivered. There is a moment right before the player with the ball looks up to see where the ball should be crossed. That’s the moment when the runner should change direction and pace, so it shows where the cross should come in. Let’s break down the three most common runs:

First Post Run

People often complain that we don’t have too many classic strikers anymore. The classic striker does the first post run and gets to the ball first. The true striker instinct is to get to the ball first. They can striker with their foot or it might be a header, but they have to get to the ball first, often including physical contact with the defender. The striker’s run is often straight through the middle. Then at one moment the striker needs to change direction and sprint to get in front of the defender. That special moment is when the striker notices that the crosser is ready to cross and has lifted their head up, so the striker starts that sprint to signal to the crosser where to get the ball.

Second Post Run

The second post run is actually more interesting. It can be the striker, but more often the opposite winger or late-arriving midfielder. The run often has two phases. First step is to stretch the defense by running further from the ball. The second step is to run into the ball when it’s crossed, often opposite from the first run. The defender won’t have this momentum and would be relatively static, so the runner can get to the ball first.

Cutback Zone Run

We briefly touched on this earlier when talking about the crosser role. Let’s look a bit more from the runner point of view. The two important parts of this run are the empty space and the timing of the run. The empty space is created both by the attacking players who run on the first and the second post. If the striker didn’t make the first post run, both the striker and the defender will occupy the space where the cutback pass should happen. Same goes for the opposite winger on the second post.

The second important point is that there has to be a run with a change of direction and pace. If the run is by an attacking midfielder, it goes from outside the penalty box, towards the penalty spot. If the run is by the opposite winger, it will have a dummy run to the second post, then cut back towards the penalty spot. We are talking about the penalty spot, but what we are really looking for is the area between the two defensive lines – the defenders and the midfielders. The holding midfielder often drops back to help the defenders, which leaves the area wide open.

Part 3: Momentum when Crossing in Soccer

Together, these three runs force defenders to cover the entire width of the box — making it much harder to defend. I want to make one more point and that is about the momentum. There are essentially three general states – players running towards goal, standing still, running back.

Counterattacking

Say there is a counterattack and our winger has the ball. Both the attackers and the defenders are running towards the goal. All types of crosses can work in that case, but choosing the perfect one will depend on the situation. For example, if the players are outside of the box when I am crossing the ball, I will try a low cross, so that somebody can run into it and have a shot. If the players are closer to the goal, I will have to pick between crossing on the first and the second post. And if players are still running and hoping for a low cross in the 6 yard box, I will either do that or look for a cut back, because the attackers have moved the defensive line so low.

Stallemate

Now, let’s say I have failed to cross the ball for whatever reason, maybe my defender blocked me or simply prevented me from crossing the ball. My teammates have slowed down and stopped, same as the defenders. If I try to cross the ball at that point the teammates are outnumbered, have no momentum and some of them might be stuck in offside. Two factors can change this. Firstly, a good cross can fix that – either a very strong ball that bounces close to the goal, or a precise cross that will float above the heads of the defenders and land in front of a teammate. Secondly, the crosser is close to the goal line, then there is virtually no risk of offside. This is how corner kicks often look in a game.

Pullback

Finally, let’s assume that I have made a fake cross, then switched to my other foot and plan to cross. The result is that defenders are regrouping, starting to push up, creating an offside trap. Doing a cutback cross at this point is usually useless. Doing a regular cross usually results in an offside. The most important player here is the late runner who will aim to get the ball into space or at least break the offside trap. If you don’t have that runner, it is very hard to create anything against a good opponent. You often see at set pieces that the defenders push a high line with an offside trap, only to be broken by a late runner, not the usual suspects who are all caught in offside.

Part 4: Training Crossing in Soccer

How do you introduce this in training? Let’s go step by step:

  • Ages 6–9 (No Heading, Simple Finishes)

Start with low, ground crosses. Drills: 3v1 in wide areas — winger crosses, striker finishes with the inside of the foot. The rule is that the winger must cross from wide, outside of something that will look like a penalty area. Focus on timing of the run rather than power.

  • Ages 10–12 (Introduce Aerial Awareness, Still Minimal Heading)

Add bouncing crosses and whip. Players can start practicing attacking different zones of the box. Encourage players to recognize when to cut back vs. play across goal. At this age, cut back crosses will already work just fine. So really, the three options are low on first post, low on second post, and cut back. If the striker goes on first post, the second winger is ready for second post or cutback. If the striker waits, then the second winger makes the run.

  • Ages 13+ (Introduce Heading, More Complex Patterns)

Now heading is not just legal, but also safe to introduce. Practice timing jumps and attacking the ball at its highest point. Add more defenders to simulate real game pressure. Drill: 4v2 crossing and finishing — one crosser, three attackers, two defenders, plus a goalkeeper.

  • Advanced Level

Professional clubs today have dedicated coaches only for set pieces, which of course are just one aspect of crossing. The main thing in the advanced level is the flow and the timing. Things are executed at full sprint and things are coordinated, such as full-backs overlapping, midfielders arriving late, wingers rotating inside. There is wide crossing, but also crossing from half-spaces, trying different types of crosses, different kinds of runs and with different momentum.

Part 5: The Defensive Side of Crossing in Soccer

While this video focuses on attacking, you can’t talk about crossing without mentioning how to defend it.

  • Goalkeeper
    • Needs to command the box. Coming out for a cross can kill the danger before it even arrives, but it has to be well timed. The goalkeeper has to do the most communication and be the most vocal person in the box.
  • Defenders
    • Near-post defender must block the most dangerous run and don’t hesitate to kick it out for corner.
    • Central defender takes the striker in front of goal and often should care more about not conceding, then intercepting the ball. What I am trying to say is that they must prevent the striker from getting the ball first and foremost. Let the other teammates worry about the ball.
    • Far-post defender must tuck in but still be aware of the back-post run.
  • Midfielders
    • Track cutback zones. Many goals come from midfielders arriving late and unmarked. The holding midfielder might drop to help the defenders, but the other midfielders must get back and be disciplined when the team is defending. If not the cross, they will need to clear the second ball.

By sprinkling in defensive awareness while coaching crossing, players understand the balance of the game better.

The Magic of Crossing in Soccer

Crossing may look simple, but when done right, it’s one of the most powerful ways to break down defenses. The timing, the delivery, the finishing — they all have to work together.

If you found this breakdown helpful, check out my other videos on attacking movements and positioning. And if you coach or play, try some of these drills with your team — you’ll see how quickly crossing can become a real weapon.

Soccer Positioning

Soccer Positioning Explained – Beginners to Pros

I can’t coach you height. It will take me years to coach you technique and it will take you years to develop physically with the right training plan. But you can instantly improve your game with getting better at positioning and movement. And I am not talking about a bit better. You will see the difference of getting the ball and being frustrated again. Positioning isn’t just about where you stand — it’s about how you make the game easier for yourself and your teammates. In 11 lessons, I’ll get you there. We’ll start with the basics, then build up step by step until you’re thinking like the best players in the world

Basic Soccer Positioning – Learn them ASAP

The first 3 lessons are The Basics of Positioning. For most of you, this will be too elementary. However, I still see it at top teams, where a player is too tired or careless and doesn’t do these basic things. They are simple to explain, but not easy to do, especially on a consistent basis. The time to learn them is as early as possible, regardless of the age of the soccer players.

1. Compress on Defense

When your team loses the ball, think compress. Individually, that means you get between the opponent and your goal. You close down space, you deny passing lanes, and you make sure that if they want to score, they have to go through you. If you are marking a player without the ball, they have the advantage of deciding when to make a run. However, your positioning between them and your goal gives you an advantage of being closer to your goal, so there is less distance to cover.

2. Expand on Offense

The opposite is true when you win the ball back. Think expand. Stretch the field, give your teammates options, and create space to play. The wider and deeper you move, the more passing lanes open up. If you receive the ball, you have more space to maneuver it and decide what to do. If you don’t get the ball, then you’ve dragged your opponent further away from your teammate and created space for them.

3. Be Available and pass

The simplest rule: can your teammates pass to you? Positioning is about being seen and found. If your teammate with the ball looks up, are you showing in a way that makes the game easy for them? Don’t hide next to or behind an opponent. And if you have the ball, look to quickly move it. If you are not sure you can dribble or shoot, it’s ok to pass it, it will come back to you.

Intermediate Soccer Positioning Lessons

Now that we know the basics, let’s get into the intermediate positioning concepts. You need to really understand and practice the basics, but that will only get you so far. If you are playing full field 11v11 soccer, only one player has the ball at a time. That means that 21 players on the field don’t. What they do with their bodies can be just as important, if not more, than the player with the ball.

4. Playing Area vs Boundaries

There’s a difference between just being “on the field” and being in the actual playing area. If you are defending team, try to cut out the passing lanes and redefine the playing area. While this team is playing 11v11 officially, they have isolated the right back, center mid and right winger, in a 3v4 situation. The extra defender is there because the other side is completely empty, but they don’t care because that’s not the playing area. By closing the passing lanes, they’ve essentially redefined the playing area into this 3v4 tight area.

5. Third-Man Support

The third man is a key concept. Sometimes the teammate with the ball can’t pass to you directly. But if a teammate comes to help at the right time and the right spot, they can be the support. Instead of the ball going directly from Player A to you, it goes from Player A, to Player B, and then to you. That little triangle unlocks defenses. Check out the deep dive video about this on the channel.

6. The One-Two Instead of Dribbling

Instead of forcing dribbles, think one-two. If you pass and immediately move, you position yourself for a quick return that often beats defenders. Imagine you are facing the defender, so your momentum is forward and the defender is exactly the opposite. Instead of risking with a dribble, use your teammate for a quick one-two and sprint pass your opponent. It’s simple positioning and timing that makes you look way faster than you are.

7. Playing Into Space

Remember: the further you are from the ball, usually the more space you have available to receive. The ball takes some time to travel. If a teammate is nearby and an opponent has closed the passing lane by being in the middle, then it’s really closed. However, if the distance is large, then the passing lane is not really closed because you pass where the player should be by the time they receive the ball, not now. You can pass on either side of the opponent, or even lob the ball over their head.

Professional Soccer Positioning

The concepts so far can be seen on a pickup from some experienced players. They are individual skills that come natural after a few years of playing. However, at the top level, this won’t cut it. It’s like playing chess looking only 2 steps ahead; it’s a good start, but if the opponent is looking 6 steps ahead, you are in big trouble.

8. The Third-Man Run

At a higher level, it’s not just about supporting passes — it’s about running into space while the ball is still played between your teammates at a different part of the field. That’s the third-man run. You anticipate where the ball will end up and get there just as your teammate plays it. You have to make the run, but your teammate must see you and execute that pass at the right moment, too. Check out the video talking about the third-man runs in depth.

9. Inviting Pressure to Create Space

Sometimes, the smartest positioning is not about putting pressure and attacking forward, but inviting the pressure from the defense to stretch the field. You receive the ball knowing defenders will close you down — and by drawing them in, you open up space for your teammates. This is how top midfielders control games. They don’t just keep possession, but they make the opponent believe that if they put more pressure, they can gain advantage. Of course, there is the element of risk, but that’s why only top teams do that well.

10. Switching Sides

If one side is blocked, the best players reposition to switch the attack. Let’s say your winger just got the ball and you come closer to them as a creative midfielder planning for a 2v2 situation. If the defenders all came there very fast and the situation went from 1v1 to 3v5, then your role is not to attack anymore. You need to recycle possession and look to switch the ball to the open space on the far side. There is a 1v1 situation opening there, so exploit it.

11. Just stand there – wait for the opponent to challenge

This is the hardest lesson for players, because they have been conditioned to always be active. Let’s take the example from before where you got a 2v2 potential opportunity. Once you’ve come to support, you think it’s up to you to decide if you should come closer to the ball, do an overlap or drop to receive the ball. Your positioning reacts to what the opponent gives you in some cases. If your opponent is just marking you, your teammate still has the 1v1 situation. If your opponent is marking you very tightly or decided to challenge your teammate, you make an underlapping run straight to goal. If your opponent dropped deeper to support their teammate, then you can receive the ball to play one-two or switch sides. In all of these cases, your opponent decided which risk they are willing to take. In the meantime, you just stood there.

You are never done learning soccer positioning

These were the 11 lessons that you should understand, study and practice, in order to develop your positioning where you benefit from being in the right time at the right place. If you start practicing these steps, your positioning will improve faster than your fitness or your technical skills ever could. Positioning makes the game easier — and that’s why the best players seem to have so much time on the ball. Thank you for watching! See you in the next one!

Playing from the back: 7v7

Playing from the Back: 7v7 Soccer Formation

If your 7v7 team treats goal kicks like hot potatoes, just punting the ball upfield and hoping for the best — you’re not alone. But what if I told you those few seconds after winning a goal kick could be your biggest opportunity to teach your players composure, decision-making, and real tactical awareness?
Playing out from the back isn’t just something for professional teams with perfect pitches and TV cameras. It’s one of the most valuable habits you can start building right now — even in 7v7 youth soccer. We’ll break down what playing out from the back really means, why it matters at this level, and how to do it in a way that makes sense for young players.

How do you Play From The Back in 7v7?

Firstly, let’s set the stage. 7v7 is usually played at U10 or younger in the US. This is relevant because we will assume that players can only kick to about half the field. If this is an adult league and players can pass anywhere on the field, then the story will be different. This is because I would advise that if there is a high press of the opponents with 4 or 5 players high up, you should always try to find your attackers up front and give them a chance to score a goal. In fact, if you have a player at U10 that can distribute these passes, do that. I have seen it once where the goalkeeper could pin a pass anywhere on the field. That changed our tactics to avoid high press when he had the ball. One more detail for the context of this analysis. We play in a 2-3-1 formation and the opponents also play in 2-3-1 formation for now. We will discuss how to adapt to different kinds of press later in the article.

Our formation gives us numerical advantage at the back, with two defenders and goalkeeper against the one striker. Why is it that hard to break from it then? If the opponents are not playing high press or at least not successfully, there is not much we need to do. However, at youth levels, the technical abilities are often not developed across the players, same as the positional knowledge or discipline. So, high press is extremely effective, compared to professional games.

Usually the opponents start closing the other passing options and from 3v1 it becomes 3v3 or even 3v4. The wide players on our team cannot receive the ball with the passing lanes closed, while both the central midfielder and the striker are also marked tightly. If we ask the players to position rigidly in their positions, waiting for the ball, they will likely be exposed.

Principles for Playing from the Back

Some coaches want to coach patterns, but I prefer coaching principles first. The reason is that patterns are faster, but they are not scalable. I change one parameter, such as the opponent’s formation or the moment we switch to 9v9, and everything falls apart. Instead, I prefer to coach principles – coaching the “why” before the “how”. Here are the most important ones to coach at this age.

Principle 1: Be available and want the ball

When you have only 6 teammates on the field, you have to be either available for the ball or be one touch away from it. In the situation earlier, you saw that the defenders tried to convert a 3v1 into 3v4 by cutting out the passes to the players they were marking. As a teammate, you want to change that and become part of the game again. So, maybe the wingers will drop lower to be able to receive that pass. Or the central midfielder will move sideways to open a channel for the pass. Soccer is a team sport, you need to make the life easier for your teammates.

Principle 2: Anticipation is more important that physicality

The true speed in soccer comes from the brain, not just the feet. Let’s look at a simple play. The central defender on the right received the ball. The striker is blocking the pass to the central midfielder and rushing forward, one of the winger is blocking the pass wide, while the other one is closing in on the other defender. The elegant solution is for a soft ball into space for the central midfielder who will find the winger who is already running forward as a third-man and we are off to a quick counter attack forward. In order for all this to happen, you need at least the central defender, the midfielder and the winger to all anticipate the movement of the defenders and of each other. If the ball is passed into space, but the receiver is clueless about their role, it will not work.

Principle 3: Booting and long pass are not the same

If the defender in the previous situation can kick the ball far enough for our striker to receive it, they should always do that. Obviously, if the striker can just go and score after receiving the ball, then that’s the fastest path to the goal, which is what we always want. However, if they can’t just turn and go to goal, it’s still much better to break the lines. We did a deep dive on breaking the lines, so check that out. In a nutshell, the striker can drop the ball to any of the three midfield players, all of whom are running forward and facing the goal. That the is the north star. Also, it pushes all the opponents to sprint back and try to cover, instantly breaking the high press of the opponents. Do this several times in a game and they will just stop pressing with the same intensity, knowing that they have to sprint back because of these passes.

Principle 4: Attract, then exploit

The previous example showed how to break the high press. But what if there is no high press? Oh, there will be. It is nearly impossible for U10 players to stay so disciplined without the ball and keep a low block. Even if they stay in shape for some time, one by one they will get restless and stay off position. But it’s easier for the team in possession to wait a bit longer for this uncoordinated pressure to come. At that point, the objective is to find the free player, usually the one that was supposed to be marked by the undisciplined defender. The goal of playing out is to invite pressure to create space further up the field. You’re not just passing to pass, you’re manipulating the opposition.

Context change when Playing from the Back

I talked about principles and not patterns. Does that mean that these principles work if some assumptions have changed? How can we adapt our game patterns based on what we are seeing in the soccer game context? Let’s look at what changes and what doesn’t.

Playing from the Back against different formations

The build-out structure depends on the opponent’s pressing shape. If the opponents were pressing with two strikers in a 3-1-2 formation, then we might do something different. Our goal is not to pass to our defenders, but to progress the ball forward in possession. So our defenders can drag the strikers for a high press while we distribute to our wingers that are wide open. Maybe the goalkeeper can do a straight pass or use the central midfielder or the striker for it.

Trigger and Pattern Recognition when Playing from the Back

Trigger recognitions are the AI of youth sports. The experience trains the mental models to recognize what will happen next based on other games and the current game, too. Several years ago, I was coaching youth team. We were playing against another team that always distributed to their right center back who always tried to pass to their right winger. They kept repeating the same thing on each attack. After seeing that 3 or 4 times in a row, our team adjusted. Also, I just moved our right winger to help on the press where the ball always went. The opponent didn’t change for this. It was simply too easy to win every single ball with numerical advantage and predictability. I assume that the other team had only one practice where they repeated this pattern and didn’t have time to work on another solution. The issue is that the players did everything right as agreed before, but you can’t place a rigid pattern in the wrong context and expect to work.

Escape Routes when Playing from the Back

Escape routes are premeditated. The parent do yell boot it on the first sign of danger. The coach believes they are the reincarnation of Pep Guardiola and demands no booting and only tiki-taka. Who is wrong? Both! The player should make a decision, there is no game controller to be operated by the parent or the coach. The player should know the escape routes like a passenger on a plane. Even before they are in position to need them. The player should know that in addition to the perfect passes. There is also the progressive dribble forward or carrying the ball away from the opponent until the opportunity for a pass shows up. Trying to determine what is safer, riskier or risk-worthy at the moment of high pressure is very hard. But if this is discussed at practice, then we enable the players to keep composure when they are under pressure.

Errors when Playing from the Back

Final thought – playing from the back leads to mistakes, right? Absolutely. The main reason why we must coach playing from the back, is because we want to limit those mistakes now. Some players will be in situations where the team will just play long balls, or the opponents will keep low block the entire game. But we want to give them tools to handle the other situations. You don’t want to have a large gap in the toolbox where the opponents know that every time they press it leads to a goal scoring opportunity. These mistakes are more normal at the very young age, so it is much easier to handle them.

Remember – teach the principles and the patterns will come.

Overlaps and Underlaps – The Most Misunderstood Runs in Soccer

Have you ever wondered why overlaps and underlaps often look like useless motions to keep players fit? They rarely work the way you think they should, so it’s just players running around in some patterns. Let’s break down what the end objectives and options are, how you can have effective overlapping and underlapping runs, as well as what drills can be effective to coach this.

What is an Overlap?

In a nutshell, overlapping run is when a player further away from the goal runs forward on the outside of their teammate. Let’s use a winger and a fullback as the ball-carrier and the runner, respectively. Often times, the winger has the ball, which leaves two attacking options to the them – pass to the runner, the fullback, into space or cut on the inside.

If the overlap finishes with a pass, then the runner will try to outrun the defenders, or cross the ball, or cutback to a free teammate. Either way, the momentum should give the advantage over either their original defender or the defender of the original ball-carrier that helped.

If the overlap didn’t result in a pass, it might have meant that one or both of the defenders dropped deep to cover, leaving the ball-carrier with options to cut in or dribble. Either way, the overlap can still be considered a success if it created this opportunity for the player with the ball to have a clear shot on goal.

Does overlap work only when the winger has the ball? Absolutely not! Here’s another setup with the winger not having the ball, but instead the striker receiving the ball. The winger cuts in, while the fullback does an overlapping run. The defenders are all confused. Should they track the winger, who can shoot more centrally, or the fullback, who can exploit the space behind the last line? All this without either of them having the ball.

What is an Underlap?

What about underlapping run? You hear it much less, but it can be just as effective. This run uses the half space. If the winger has dragged their defender to the flank, and the striker is staying with the central defender in the middle, then the half space is empty. A run from attacking midfielder or even the fullback can really bring danger. The ball can be either with the winger or the striker. Either way, both of the defenders recognize the danger in case the underlapping runner receives the ball in a clear position to shoot at goal.

Both overlapping runs and underlapping runs are stretching the defenders and are splitting lines, as well as pushing the offside traps lower. On top of that, they create space by leaving areas, dragging defenders deeper and breaking the defensive formation. Check out the channel for detailed videos on these topics.

How do you Coach Overlaps and Underlaps?

Let’s structure the drills into three categories – unopposed, semi-opposed and situational games. While drills should strive to be as close to the game situation as possible, there is a benefit of putting more constraints for certain period of time. The first four drills are solid warmup drills, often repeating before a game for muscle activation or at practice, but also a way for players to get familiarized with overlap and underlap. I usually introduce them as finishing drills, because the final step is to strike the ball. Note that you shouldn’t do them in the same practice, or even the same week. Give them some time to get proficient in the overlapping, before they do the underlapping drill.

Here are the first two drills, essentially doing only 1-2 passes. You only need two players to do them, which means you can even do a variation of them when you do individual practices, where you as a coach are one of the players. Note that these will become boring very fast, so it’s just a stop gap until you move to the next two – one for overlap, one for underlap.

Unopposed Drills

The overlap drill starts with one midfielder passing to the striker, the other midfielder already sprinting towards the striker to receive the ball. Then the first passer does an overlapping run to receive the ball on the flank only to cross it to the striker. Then the midfielder stays back to be the striker and on it goes.

The underlap starts similarly. However, once the second midfielder receives the ball, the first passer cuts to make a run between the two teammates. They can then do a one-touch finish. With that structure in mind, you can keep the striker and second midfielder in place and only rotate them from time to time.

Coaching points for Overlaps and Underlaps

What are the coaching points in these two drills? The most important thing is to understand the timing. For example, in the second one, the first midfielder firstly jogs toward the striker, then it changes direction towards the other midfielder or even stops. Then there is some sort of communication, like eye contact. Then they change of pace and direction, straight sprinting into the space. It is important for runner to understand that this change of pace and direction is enough to escape their defender if done right.

Also, for the passer to understand that the timing and weight of the pass is crucial. A slow ball that the runner has to wait for is useless, same as a late ball that will leave them in offside. If the ball is too strong, then it would go out of bounds or the goalkeeper would intercept it. When running unopposed drills, you as a coach must set the standard of excellence. It is hard to set the fake urgency and give the feedback like you make up opponents, but that’s why you are the coach.

Semi-opposed Overlapping and Underlapping Drills

There is a gap between being familiar with the overlapping and the underlapping runs, but not being proficient in them. In that case, you want to have semi-opposed drills. I will suggest two of them. The simpler one is just a 3v2, with focus on the runs. If you do a similar setup as the unopposed drills, you will need to change very little. The player with the ball will either have a free option for a pass or free space for dribbling. Unlike the previous drills, the players in this drill will need to make decisions based on the defenders. When executed well, the striker can even receive on half turn and progress immediately to shoot. However, more often they will look to distribute. The only restriction I usually do is give 6 seconds to take a shot on goal. You don’t want endless passing and dribbling in a 3v2 situation. It should look like counter-attack.

We can’t always assume that there will be space, so now we will get into something that looks like a low-block situation. We will set a 5v5 situation, but we will limit the movement of the defenders. Only one defender can be outside of the penalty box at a time. So if a player pressed on one side, it needs to come back inside the box so that another player can press once the ball has moved. That way the overlapping and the underlapping runs are easier, same as the crosses.

Game-like drills for overlaps and underlaps

Finally, have a situational game, focusing on the final third. Of course, you can coach them when playing from the back, but it’s less common. You can have 6v5 situation, trying to attack in the final third. The attackers will need to stretch the field, making underlapping and overlapping runs. Also they will switch the ball quickly and utilize the third man. You can find a detailed video about the third man pattern on the channel. However, your focus here will be to use the concepts of overlapping and underlapping to displace the defenders. For example, a winger must stay wide to stretch their defender or get a free cross otherwise. If that doesn’t happen, then an underlapping run must come soon to stretch the field.

THIRD-MAN SOCCER

Third-Man: Tactics Every Soccer Player NEEDS to Know

The Third-Man Principle is all about creating passing options within the playing zone by adding a facilitating passer and exploiting space in ways that break down defensive structures. Third Man Run is about shifting the playing area. Move the ball into a place where the dynamics are more favorable for your team as there is a running player.

What is the Third-Man Principle?

The Third Man Principle is a tactical concept that revolves around creating an advantage by using one player to indirectly support another in possession. To put it simply, it’s about finding ways to create a passing triangles. One player makes a run to support a teammate, and the third player in the triangle (the “third man”) provides an unexpected passing option.

Basic Example

Let’s walk through an example. Imagine a scenario where Player A has the ball and is looking to pass to Player B who is in a good position to reach the team objective. Normally, the pass to Player B would be blocked by a defender. But Player C—who’s positioned just a little off to the side or behind—makes a run to receive the ball from Player A.

Player A doesn’t pass directly to Player B; instead, they pass to Player C, who then plays the ball to Player B. The key here is that Player C is not under pressure. The defender is left scrambling, trying to cover multiple options. This quick, unpredictable movement can create space and break down defensive lines.

Playing from the back example

Let’s give few situations of how the third man run can be utilized. Firstly, we’ll start with playing from the back. A simple pass from your goalkeeper to the central defender. Then you want the next one to be from your defender to your fullback, as it is a bit higher up the field and also safer and less crowded on the side. However, the opposition winger knows that and is blocking that pass and starting to put pressure on the defender. Instead, the central midfielder comes into the empty space and just needs to do a one touch pass to the fullback. That’s it. This is the bread and butter of playing from the back.

Final third example

Let’s look at another example, where the passing lane is not blocked, but the pass is impossible because the defender is pressing high. We want our winger to receive the ball from our fullback, but they cannot in this setting. Instead, we utilize the creative midfielder that does something similar as before, but in another area of the field. In this case, the moment the ball is passed to them, the defender is often stunned and trying to see where the ball is going or even starts to move towards the central area. The winger then starts to make a run and the defender is at least one step behind, often way off. The ball goes into space and the problem is solved way more elegantly than beating the defender 1v1.

What is the Third-Man Run?

The third man run is when two teammates look to be playing a one-two, but another teammate is making a run to receive the ball in a more dangerous area. In a very generic example, say we have a 2v2 situation in the central area. Then a player that makes a run in the wide area means that they have already won against their opponent and is just missing the ball. So we move the ball to them. Why would is it easier for them to beat their opponent? Because the human psychology makes their defender focus on the playing area. They either come and help the teammates to make a 2v3 situation, or they simply relax for a moment thinking that the danger is not there. Either way, it is a favorable situation for our third man. To get the timing it might be a one-touch pass or a delayed pass with La Pausa to invite the pressure and create space. We will run through three examples to illustrate this at different areas of the field.

Examples

If we start from the fullback and pass to the centerback. Then the winger keeps the pressing and cuts the passing lane back to the fullback. That press by the winger changes the playing area and takes our fullback out of it. Then the centerback passes to the midfielde. Now the midfielder passes into the fullback that made a run forward in the meantime. This pass made the playing area move there, with the fullback already on the run forward.

Here is another example of the third man run, way more devastating for the opponents. The focus is all in the middle with the striker looking for help from the midfielder to do 1-2 passing. The midfielder can even yell “1-2”, but then once it receives the ball, they find the runner on the wing. All eyes were in the central area. Unless the fullback was so diligent to track the runner on time, this can be an easy goal. The coordination between the winger and the creative midfielder falls apart.

Here is one more special case, where the striker wants to use the midfielder for a combination. However, after the pass and the run, the striker doesn’t get the ball and is in offside situation. Then the whole world kind of freezes. The defenders are thinking that they have solved the threat by holding the offside line. However, the pass to the third man in the wider area unfreezes the attack and the striker is back in action as the second pass can go to them.

What do you need to make good Third-Man?

The crucial elements of both the third man principle and the third man run are the off-the-ball movement, the vision and the exploiting of the space.

Off-the-ball movement

…is crucial. In the third man principle, the third man coming in as a facilitator needs to find the perfect timing when they will be available to receive and pass the ball. If they are too early, the opponent will adjust and potentially intercept the ball or the pass will not longer be available. If they are too late, then the teammate with the ball will be under too much pressure. Similarly, for the third man run, a well timed run is essential, so that we can create a dynamic advantage. Too early and the third man gets covered or ends up in offside. Too late and the ball is lost or moved somewhere else on the field.

Vision

… is the other key characteristic of these patterns. Vision is not about players that can see other players, but it is to see several steps ahead, like in chess. In the third man principle, the player needs to see the objective of the two initial players and their obstacle. Then they need to see how getting into the empty space can change the perspective. Finally, how the steps will evolve from then on. Similarly, the third man run is exactly that – a run. The vision of the passer and the runner is seconds ahead, where they need to see what will happen if they coordinate their movements together. The vision is built over time and experience, by playing soccer for years and years and seeing what is possible and how to make it happen. Naturally some players are more talented in seeing this, but it is also a trained skill.

Exploiting space

…is the secret to both the third man principle and third man run. We talked about changing the playing area by moving the ball. But in order for that to happen, the players off the ball need to create a favorable situation before the ball gets there. Exploiting the space is exactly that. For example, leaving the space empty is important, so that the space can be exploited at the right time. This can be the space for passing or for the run behind. Either way, understanding the space is vital.

Can you see the Third-Man in Pro Games?

One of the most iconic uses of the Third Man Principle is in the way Barcelona used it during their tiki-taka era, especially under Pep Guardiola. The movement of players like Xavi and Iniesta was a textbook example of the Third Man Principle. They were constantly working off each other’s passes and positioning, pulling defenders out of position, and creating extra options for the ball carrier. It would often look like they were passing to each other with no purpose. However, at one point you will see the wingers, such as Villa, Pedro or Henry, or even the wingbacks, like Alves and Alba, making a run on the wing and before you know it the third man run creates a perfect opportunity to score.

That is a textbook example of using both the third man principle and the third man run. However, I challenge you to watch a game. Whenever you see players playing from the back, you will see the third man principle. Also, you will see runs that hard-working players make even when they don’t get the ball. The expectation for them is that they will get the ball once every 5 to 10 runs. However, all they need is one perfect play in the final third and the goal scoring opportunity is there.

How to coach?

There is a reason we are still talking about the Xavi and Iniesta style of play, even though we haven’t seen them play in Barcelona for the last decade. It is not normal to find players that are technically dominant, have world class positional awareness and possess exceptional vision.

However, you do need to coach these concepts, as both Xavi and Iniesta have been coached at the famous Barcelona academy called La Masia. At the very young age, you should coach playing from the back and that might be the first time they will see the usage of the third man facilitator player. These will become recognizable patterns for the players, but it will take years of repetition and variations to become second nature.

You will need to have overloading drills, where the attackers will outnumber the defenders. This is because the natural moves for players might be to dribble or to pass back. Instead they can make overlapping runs or even underlapping runs that will naturally create the third man situation. If you are trying to change that, then the pressure has to be decreased a bit. Not completely, but sufficiently enough to give some time and direction to the players to find these opportunities. To counter this numerical overload, you can restrict the attackers not to be able to pass back to the same player.

Summary

To sum it up, the Third Man Principle and the Third Man Run are game-changing tactics that relies on intelligent off-the-ball movement, quick decision-making, and exploiting space. Whether you’re a player or coach, understanding and implementing this principle can improve the fluidity of your team’s attacking play and help break down defensive lines.

Next time you watch a game, pay close attention to how teams use the Third Man Principle and the Third Man Run to create space and opportunities. It’s a subtle, yet incredibly powerful aspect of modern soccer tactics.